What are pixels, resolution and DPI?
When words like pixels, resolution and dots per inch (DPI) get thrown around, most people seldom understand that these terms being used to describe a digital image file are in fact all related! So let’s make life a little easier and demystify the relationship between pixels, resolution, DPI and how that affects the quality of your image from a printing perspective.
What is a pixel?
Pixels are what makes up a digital image on your screen.
If you open an image file in any photo editing program on your PC/Mac & zoom in far enough, you will see that your image is a grid or a neatly arranged mosaic of small and equally sized squares.
These squares are better known as pixels and they’re always arranged in a row and column pattern as shown in the graphic.
The number of pixels and the way they’re distributed on a 2D plane, specifically the number of pixels in the width & the height of the image is what we commonly refer to as pixel dimensions or pixel resolution. So if an image has pixel dimensions of 3000 x 2400 pixels (px), what that really means is that there are 3000 pixels in the width of any one row of the image and 2400 pixels in any one column of the image. To find the total number of pixels in this image, you would use the same logic to calculate the area of a rectangle, multiply the number of pixels in the width times the number of pixels in the height.
So how does DPI tie into all this?
DPI (also known as ppi) is an abbreviation for dots (or pixels) per inch and it’s used to define the print resolution. When printing high quality & detailed images for large format lenticular, a DPI of 150 is ideal & recommended. What this means is that for every 1 inch of the printed image, either width wise or height wise, there are 150 pixels in that measured row or column of pixels. In the printing industry, the term resolution can be used interchangeably to describe dots per inch, or defined in the pixel dimensions.
To further clarify, let’s take our previous image with pixel dimensions of 3000x2400 pixels. To print this image at its highest quality which is at 150 DPI, the image comprised of 3000x2400 pixels must be printed at a size of 3000 px ÷ 150 dpi = 20 inches wide by 2400 px ÷ 150 dpi = 16 inches high.
One thing to note for simplicity sake, our examples with 150DPI are for large format printing. When your project requires printing larger quantities on an offset press, a resolution of 300dpi is required.
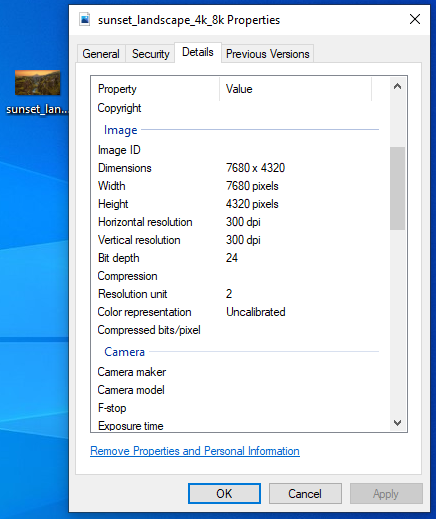
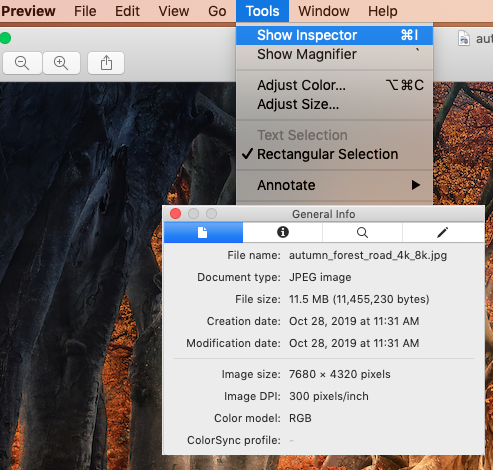
How to determine the pixel dimensions and DPI of your image file on Windows & Mac?
On a Windows system, you can right click an image, click the Properties option all the way on the bottom and a window should come up. In the properties window go to the “Details” tab. Scroll down a bit until you see the image section; this is where the image’s pixel dimensions are listed as well as the resolution of that image file.
Similarly, on a Mac system you can right click on an image file, and open with Preview. Once the image is loaded into Preview and you see it on your screen, press ⌘ + I or go to the Tools menu and select the Show Inspector option. A small window with the image details should come up which lists all the pertinent information.
Pixel Count Quick Reference Chart
| Size Up To (W" x H") | DPI | Pixel Dimensions |
| 11" x 14" | 150 | 1650 x 2100 |
| 16" x 24" | 150 | 2400 x 3600 |
| 18" x 24" | 150 | 2700 x 3600 |
| 20" x 28" | 150 | 3000 x 4200 |
| 22" x 28" | 150 | 3300 x 4200 |
| 20" x 36" | 150 | 3000 x 5400 |
| 24" x 36" | 150 | 3600 x 5400 |
| 32" x 42" | 150 | 4800 x 6300 |
| 38" x 48" | 150 | 5700 x 7200 |
| 32" x 56" | 150 | 4800 x 8400 |
| 38" x 48" | 150 | 5700 x 7200 |
| 42" x 56" | 150 | 6300 x 8400 |
| 46" x 60" | 150 | 6900 x 9000 |
| 46" x 70" | 150 | 6900 x 10500 |
How to set the DPI of an image to 150 dpi using Photoshop.
- Launch the photoshop application on a PC/Mac. Click "File" in the menu bar on top, then click "Open" to select your image file located on your system. Alternatively on a Mac, you can drag your image file on the Photoshop app icon to swiftly launch the program with your image file.
- Click on the "Image" dropdown menu on the top, then click the "Image Size" option.
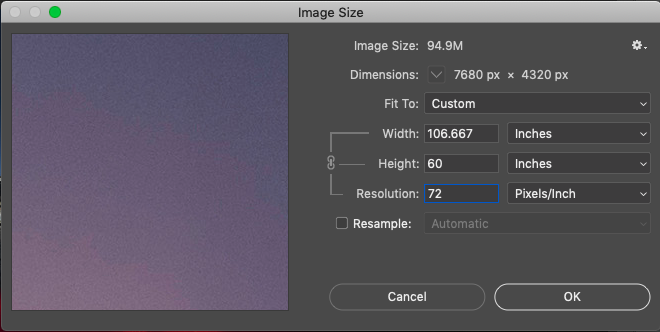
- An "Image Size" settings window should pop up looking like this:
- On the bottom you will notice "Resample Image" checkbox is enabled. We recommend you disable it to maintain the pixel dimensions and to avoid pixelation.
- Set the DPI of your image in the box where it says "Resolution" to 150.
- Now look at the Width and Height field above the Resolution box. These are the maximum print dimensions you can print this image @ 150 dpi.
- If your width and height is at least 11" x 14" or 14" x 11", your image is ready for our Builder.
- Click "OK" to apply these settings and save your file to the original format. Remember our Builder accepts: JPEGs, PNGs & TIFFs only.
- If everything looks good after following steps 1, 2 & 3 and your images have met the minimum requirements, go ahead and get started with your very own Lenticular Project!